Blender Tutorial: Making Mountains With Vector Math
I was recently asked by some friends in the computer graphics community about a method for making materials in the Blender Cycles rendering package depend on the slope of the object. This is a very simple feature in the Vue package, and is useful for adding snow to mountains or grass to the top of hills and bluffs. But unfortunately Blender does not have this feature, or at least not in an obvious form.
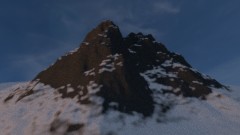
For this example, let us begin by building a mountain. In Blender this is simply a matter of using the Landscape plugin (which can be added in the User Preferences menu). Add a Mesh:Landscape object, and adjust the parameters to give the size and detail that are required. This is really just a matter of adjusting different numbers and experimenting until you have a good looking mountain. However once you move the mesh or do anything else to it, the mesh gets baked in and can no longer be adjusted so be sure to get everything right the first time.
Add a material to the mountain mesh, and build two materials - in this example I used a basic rock and a basic snow material. (As this is a tutorial only on adding slope dependence, I won't go into detail on the construction of these two materials, but there are numerous excellent tutorials on Youtube). Finally as a Mix Shader node to combine the two materials and connect it to the Material Output node.
Now add a Geometry input node. This contains several different outputs, but the one we are interested in is the Normal. True Normal would also work, but does not include the effects of bump maps and displacements. Add a Converter:Vector Math node, and connect the Normal output of the Geometry node to the first Vector input of the Vector Math node. Change the second Vector input to a unit vector in the Z-axis, or (0.0,0.0,1.0). This defines the up direction in your scene. Now change the Vector Math type to "Dot Product".
The Value output of the Vector Math node now gives the overlap between the Normal vector and the Z-Axis, so that a flat surface has value 1.0 and a vertical surface has value 0.0. By connecting the Value output to a Color Ramp node, and moving the sliders, the output of the Color Ramp can be made to give a value of 1.0 for slopes smaller than the value set by the white slider, and a value of 0.0 for slopes greater than the value set by the black slider. (In Vue the slopes can be set directly, but unfortunately in Blender the actual values of the sliders corresponds to how vertical a perpendicular line from the surface is, and so the slider position is larger for a smaller slope.) The distance between the two sliders gives the 'feathering' or 'blending' of the two materials at the boundary between shallow and steep surfaces.
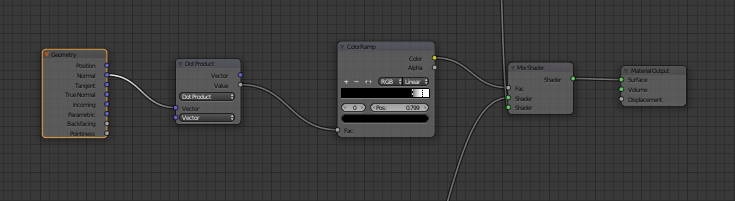
Finally connect the output of the Color Ramp node to the Fac input of the Mix Shader node. The final result should be a material which maps one sub-material to shallow surfaces and another sub-material to all steep surfaces.
So there it is - a simple method of replicating the slope dependence of materials in Blender Cycles. I hope it provides benefit to you, and you find many uses for it in your own artwork.