Blender Tutorial: Making Random Materials

A few days ago I posted the artwork above on several social media sites, and it was well received. However it also resulted in several inquiries as to how I made the materials for the gifts and the ornaments. The usual method would be to create a separate material for each colour of light, each colour of glass bulb, and especially for each design of wrapping paper. This is a lot of work, and is entirely unnecessary.
The reason it is not necessary is a great feature in Blender Cycles called "Random Input". Not many people realize that this option exists, but it can be very powerful for doing scenes like this that require multiple copies of an object, with each having a slightly different colour or design. For that reason, I am providing a short tutorial on this method. It is however aimed at Blender users with some experience, and as such I will skip over a lot of details on mixing materials and choosing between different shaders. Let us begin.
1. Create your base material in Blender Cycles. Add in all of the different shaders and textures that you require, choosing one colour/image map as an example to fine tune the parameters.
2. Now comes that randomization. Move the colour input or texture node away from the rest of the material, so that you have enough room to work with it. Use Shift+D to duplicate the input for each possible colour/texture you will want in your materials. Ideally you should use powers of two to make the math simpler (ie 2,4,8,16 different colours or textures)
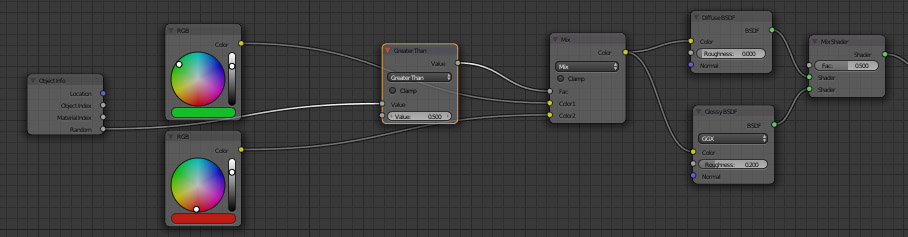
3. Use Shift+A to add an Input/Object Info node to the material. Move it to the left of the node editor.
4. Add a Mix node between the base colour/texture and the rest of the material, and connect one of the other colour/texture options to the second input of the mix node.
5. Use Shift+A to add a Math node, and select the Greater Than option. Connect the Random output of the Object Info node to the first input of the Math node, and set the second slider to a value of 0.5. Connect the output of the Math node to the Fac input on the Mix node. Now every copy that you make of the object attached to the material will randomly be assigned one of the two colours/textures.
NOTE: Setting the second input of the Math node to 0.5 gives both options an equal probability of being selected, but this can be adjusted to suit your needs. The slider represents the probability that the second material will be selected. Alternatively, the Random input can be attached to the second input on the Math node and then the first slider will represent the probability that the first material is selected.
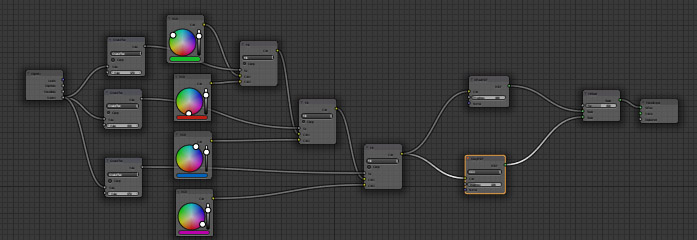
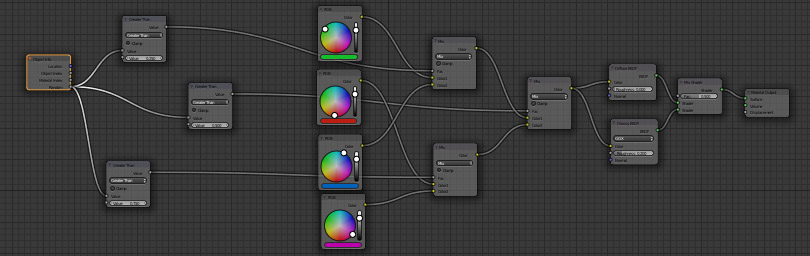
6. At this point you have two colours/textures that are assigned randomly, but this method can be repeated to produce more options. Simply repeat steps 4 and 5, adding Mix nodes between the first two colour/texture nodes and the original Mix node. Into the second input of each of the new Mix nodes add another colour/texture. Finally add two more Math/Greater Than nodes between the Object Info/Random node and the Fac input of the new Mix nodes.
7. Right now this arrangement will still only give two possible colour/texture outputs, so the sliders on the Math nodes need to be adjusted. The slider on the first of the new Mix nodes should be set to 0.25, and on the second new Mix node it should be set to 0.75. A random number between 0.00 and 0.25 will cause the first colour/texture to be passed into the original material, a value between 0.25 and 0.5 will pass the second, and so on for the third and fourth colour/texture outputs. As before each of these can be adjusted to give the distribution required.
8. If even more colour/texture combinations are required then steps 6 and 7 can be repeated again for each of those two Mix nodes, to produce a total of eight colour/texture possibilities. The slider values for the new Math nodes that are added will be 0.125, 0.375, 0.625, and 0.875.
Alternate Method:
Alternate Method: Some people find the mathematics in the previous method too complicated and confusing, and I must admit that if the number of colours and textures needed is not a power of two it is even worse. As such here is an alternate method, which is just as good for the final results but which requires a little more brute force to avoid some of the mathematics.
1. Begin by repeating the first five steps of the previous method, so that you have a material that randomly assigns one of the first two colours/textures to the object.
2. Move the slider on the Math node to match the fraction of the instances that should have the first colour/texture applied. As before, connect the output of this Math node to the Fac input on the Mix node.
3. Add another Mix node and another Math/Greater Than node. Connect the output of the previous Mix node to the first input of the new Mix node, and connect the next colour/texture node to the second input on the Mix node. Connect the Object Info/Random output to the new Math node, and adjust the slider to be the fraction of instances that the second colour is applied. (Note here that this is the colour/texture that was connected to the previous Mix node, not the one that was added to the current Mix node)
4. Repeat Step 3 until all of the colour/texture nodes are connected to Mix nodes.
5. Connect the output of the final Mix node to the inputs on your original material. Now you have a material which will randomly assign colours or textures to each instance of the material that you use.