Simple Christmas Lights in Vue

Each year I create a rendered scene to use on my Christmas cards and post on my websites. They are always simple arrangements that I can put together in an afternoon, but they do seem to bring enjoyment to people. In November 2015 I experimented with a new method of adding Christmas lights, and after posting the image above I received a number of emails complimenting the results and requesting a tutorial on how I add the lights.
In truth this method is surprisingly simple, and yet in my opinion gives a very good result with minimal effort.
The first step is to find or build a model in which the surfaces to be lit has a different material. I have been getting good results for buildings by using the Chief Architect software to design a house, and then using their Paint Material feature to paint the eaves and door/window frames with a new custom material called "LightBoard". The building then gets exported to a file readable in Vue.
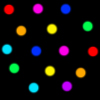
The next preparatory step for this method is to use your favourite graphics software (GIMP, Photoshop, or PaintShopPro all work well) to make two light templates. Create a small image (100x100 worked for me) and use the paintbrush tool to make several circles of varying colours (or monochrome if that is your preference). Save this file as 'colour'.
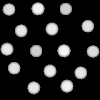
Next take the same image and convert it to black & white and save this as a second file, marked 'alpha'. (I made the white circles slightly bigger than the coloured circles in this image to provide more definition and contrast for the final lights, but this is not necessary in general)
It should also be noted here that I wanted a net light effect in my image, while for a string of lights this image would be replaced with a line of dots, and for icicle lights a motion blur downwards works really well.
Now comes the magic. Once the scene has been assembled in Vue, and the buildings imported, open up the materials tab and find the "LightBoard" material. At this point it will be a plain matte finish with some fixed colour, or perhaps an image map depending on what you built in Chief Architect. Hit the "New Layer" tab and name the new material layer "Lights".
In the colour window, open up the 'colour' file that was created above. In the alpha window add the 'alpha' file from above. You should see in the material preview window your original material, but with colour circles over top of it. (You may have to adjust the alpha function and the alpha boost slider. For my image above, the alpha function is default but the boost is set to 95%)
Now go to the Effects tab in the Material Editor, and adjust the sliders on the left to suit your own preferences. I used Diffuse:74%, Ambient: 63%, Luminous: 61%, Contrast: 11%. More important though is the Glowing Material settings, which I set as Intensity: 24% and Radius: 6%. The intensity gives a stronger light, and the radius expands the distance that the light affects. (Be warned though - my first try I used high settings for both and it completely washed out the render!). Close the Material Editor, and copy this new material to all instances of "LightBoard".
The Christmas tree in the window is done the same way. I used a basic Vue evergreen tree, and to one of the branch materials I added the same light layer. This same method can be used for close-ups of decorated trees, but I would recommend more attention to the initial light and alpha images as they don't look very good at larger scales.
And that is really all there is to adding simple Christmas lights. The rest of the render shown above is basic Vue methods - point lights throughout the house to replicate lamps, a Photoshop template and height field terrain to make the sidewalk, and slope dependent snow layers to add fallen snow to the truck. And in my opinion, it creates a nice effect. I hope that you will try it yourselves and see what lovely scenes it can produce!